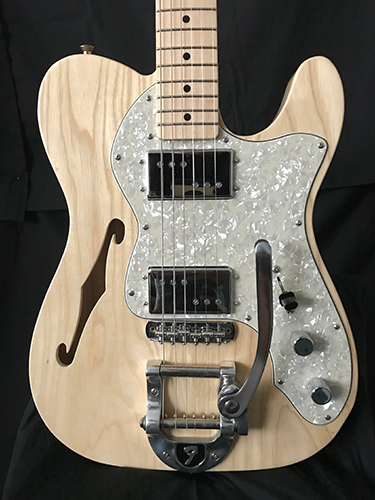
Congratulations to Rob Catterton on being our June Guitar of the
Month winner! The story behind this build holds near and dear to
his heart, as this 1973 Telecaster Thinline replica matches his
late father's custom original.

I lost my Dad suddenly in March of 2015. He played music his
whole life. In 1973 he purchased a Telecaster Thinline, which he
then modified by installing a Bigsby and doing a couple things to
it to get the action extremely low. He had this guitar until the
day he passed, and it was his instrument of choice. In addition to
being a musician, my Dad was a master woodworker and could make
anything you could imagine from a piece of wood. My Mom has his
guitar still today, and it's great to know it's still in the
family. However, I spent a while wondering what I could do that
would help sort of fill in some of the void of missing him if you
will.
So after some careful thought and a few months of research, I
made the decision to build a replica of "his" guitar. You see,
buying another and just adding his modifications wouldn't be the
same. So in honor of my Dad, I built a replica of his guitar with
my hands, as close to the original as I could. I have included some
details below on the build along with some pictures. This guitar
was the first I finished using Mohawk products, and they are now my
choice of finishes for all of my builds.
During my research mentioned above, I was able to call on some
partners that I have already established a relationship with
through playing music in our band for many years, as well as
getting the opportunity to make some new contacts and partnerships
for this build and future projects. It didn't take long to learn
that in as much as skill plays a part in builds like these, so does
having great vendor resources to partner with. The folks at Mohawk
were stellar. I made several calls to them both before and during
the build to learn about their products and make sure I was
following the correct process. Customer service at Mohawk is top
notch. As I describe the build I will try to mention some of the
other key vendors that worked with me throughout the build. These
folks can be very helpful to any of you who may be doing a new
build, or looking for other resources to assist you as well.
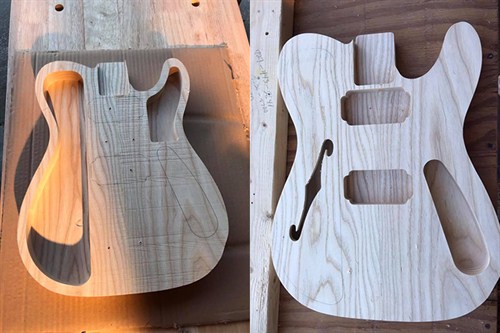
The body of the guitar is made of Ash which I sourced locally.
It was assembled basically in 3 pieces. I re-sawed the slabs on my
bandsaw to get the 5/16-inch-thick top that would then be glued
back on following the cavity routing. Once the top was glued on, I
completed the final body shaping. The cavity routing and guitar
shaping was made significantly easier by leveraging a CNC template
set that I had purchased from Potvin Guitars in Canada. Mike Potvin
was a huge help in giving correct depths for the cavities and
pickup heights.
The neck was purchased directly from Fender. I knew I could make
my own neck for the guitar, however I wanted this neck to be as
close to the original as possible. I did note on the back of the
headstock that the neck is licensed by Fender, and I have the
serial number that came on it.
I have many years of experience in woodworking, and servicing
guitars so those parts of the build were not as tough for me as it
might be for some. However, the finishing process for an instrument
was completely foreign to me. Picking the right products, using
them in the proper order, and being patient enough to follow all
the steps were extremely stressful. This is where Mohawk really
stepped up to the plate for a newbie at this like myself.
After what felt like days of sanding, I applied 2 coats of grain
filler to the guitar to get the grain as level as possible based on
the instructions I had received. Then I used 3 different Behlen
products in order to complete the finish. The first was the
Aerosol Behlen Vinyl Sealer (one of my absolute favorite
finishing products) of which I applied 2 coats, followed up by
sanding with 400 grit sand paper after letting it cure overnight. I
chose the Aerosol since I was using it on a relatively small piece
and wouldn't need a lot of it. Next, I moved on to applying
Behlen Stringed Instrument Lacquer Finish (Gloss). I applied
this using an HVLP spray system. The first 5 coats applied were
thinned with Behlen Qualalacq Lacquer Reducer, by 15%. The next 5
coats increased the amount of reducer to 30%. The final 2 coats I
applied I used a 50/50 ratio of the Lacquer and reducer which made
it not dry quite as fast and really laid down flat.
At this point I let the finish cure for 5 days. I then moved on
to leveling the finish with sand paper. I started at 600 grit and
stepped through higher levels until I reached 2000 grit. Following
the sanding I started the buffing process. I stepped through the
grit levels of buffing compounds which I purchased through Stewart
McDonald. These were Coarse, Medium, and Fine. I then followed up
with swirl remover and applied a couple coats of paste wax.
Now it was time to begin assembly. This is definitely the best
part of the build and where you can tend to rush. I constantly had
to keep reminding myself to slow down as I was really wanting to
see it together.
The electronics were a little tougher challenge. The
reproduction pickups that Fender uses today are not exact replicas
of the 73. The pole pieces are quite different, as is the sound. I
was faced with a tough decision here as I really had 3 options. Use
the reproduction pickups so as to have the look and the "Fender"
logo stamped on them, or go with an after-market option that would
be as close to the sound as possible, or finally try to obtain some
original 73 series pickups and hope they would be serviceable. I
originally decided to try and track down some originals. The
pickings were slim, and I just wasn't happy with the selection.
I then reached out to Tom Koch at Sweetwater who has been a
great help to me in the past. Tom jumped on board and was able to
set me up with some pickups from "Mojotone" that were built to the
specifications of the original. These would not have the "Fender"
logo stamped on them, but definitely have the sound I was trying to
match. I also purchased the tuners, knobs and a few other items
through Tom and Sweetwater. I reached out to Emerson for the
electronic controls. I purchased a pre-wired control assembly, and
did decide to stray from the original here and add a 4-way switch
which proved to be a great choice from a sound perspective.
Once the electronics were installed, I took some time to prep
the neck prior to bolting it on. I made a fixture and using a
straight edge, adjusted the truss rod to get the neck completely
flat so I could do some fret leveling and crowning. This is where
good tools sparkle, but great tools shine! I had purchased all of
my Fret Leveling, and guitar setup tools from Crimson Guitars in
the UK back at the beginning of the build, and they had arrived in
the nick of time. Their tools are absolutely excellent. You can
tell they are made for luthiers, by luthiers. Ben, James, and the
crew at Crimson are easy to work with and have answered any
questions I have emailed to them in record time.
With the neck ready, I bolted the it, bridge, and Bigsby Tremelo
on and the semblance of a guitar appeared. Excitement was
definitely building at this point. I installed the strings, set the
intonation and really just took some time to play and enjoy this
guitar that I had spent so much time building. I also took it out
with me to a gig we had that weekend with the intent of playing a
few songs on it. As it turned out, I played that guitar the whole
night.

Thanks for sharing with us, Rob! If you'd like to be considered
for our next Guitar of the Month, post your photos using
#MohawkConsumer on Facebook,
Twitter, or Instagram. See
you next week!