This month were are featuring a very talented luthier, Kelly
McDonald, from McDonald
Guitars! Read along as he shares how he achieves his beautiful
guitar finishes.
My latest build, shout outs and relationships:
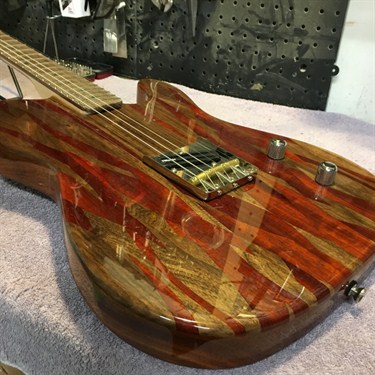
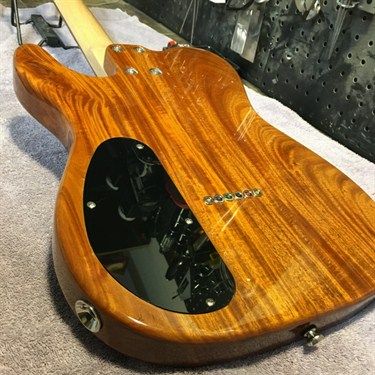
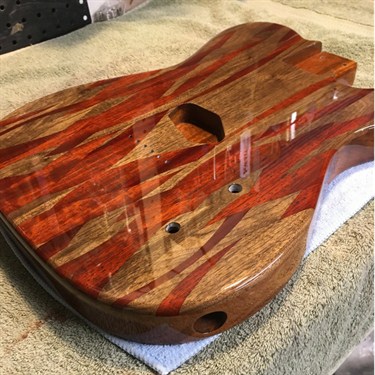
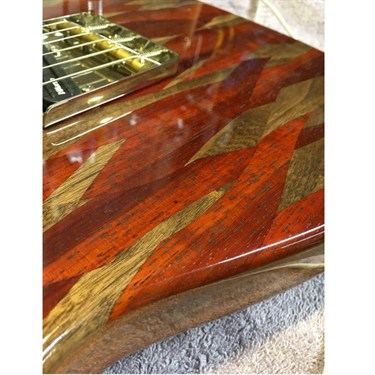
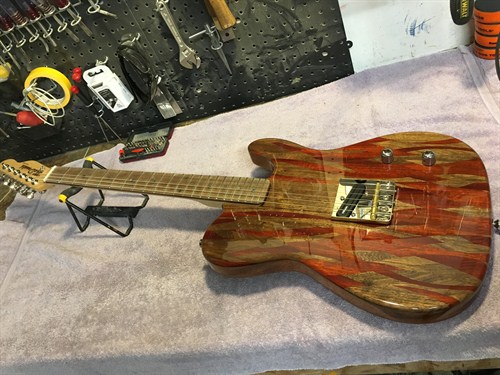
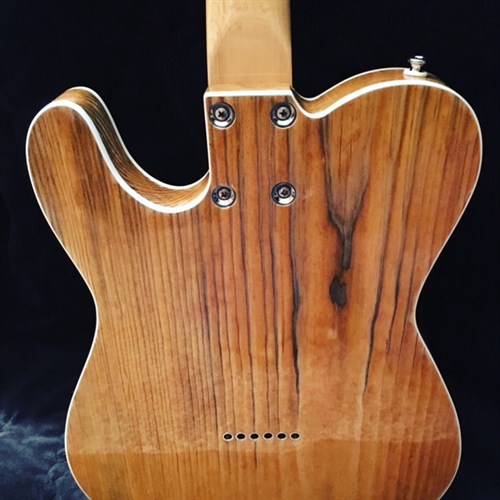
The guitar I recently finished is a mahogany body with a Black
Walnut and Paduk top that my buddy Rob from Robs Wild Wood made for me in
Texas. He has been making knife scales and pistol grips for
years and wanted to get in to making guitar tops, so he sent me a
top set to build a guitar out of. The reason I feel it's so
important to talk about the body wood and top wood is the grain and
filling that grain is of key importance. The fingerboard is Black
Walnut and came from my buddy Nate Stott Wood. I'd like to give
these guys a shout out because without them, this build wouldn't
be. I can tell you, in this business, relationships and
networking are of the utmost importance. Which is why I
choose to do business with Mohawk Consumer Products. Not only do
they have thebest, most user-friendly products, the staff there is
great. Have a question, give them a call and talk to a real
person who can help get your question answered. That really
matters to me and it's obvious that it matters to Mohawk as
well.
About Me and My Gear:
I have been a professional musician for 25-odd years and only
been building guitars for a couple of years now. I started building
guitars because I would go out on tour, come home flush with cash
and blow it all on guitars. I have worked wood all of my
life, and decided... "can't be that hard to build them". I built
myself one guitar and it kind of took off from there. My mission is
to be able to build amazing, custom guitars that "guys like me can
afford". Most of my builds are under $2,500. I do all of the
woodworking portion in my home workshop by hand, no CNC machines
here. I have learned as I have gone and started with rattle
cans and moved up to a spray gun from there. It wasn't quick
or easy to learn by trial and error. I hope this will help
people who are trying this for the first time. I do not claim
to be an expert in the field of finishing guitars but these
processes work great for me and I hope for you too. I do have
a spray booth at my disposal a few towns away and that is where I
do all of my spraying. I wear a high quality 3M respirator as
well as nitrile gloves when I spray. I started out with a Harbor
Freight Gun and went to a Husky gun from Home Depot. I now
have better guns, but I still really like to use my Husky one for
some reason. It's just a great gun, especially for the money.
You do not need to start with a DeVilbiss or Iwata gun, but please
(for your own sanity) skip the Harbor Freight guns and go straight
to the Husky gun, as it is a far superior gun in every way.
All I have ever used is HVLP gravity feed guns and could not be
more happy. I have sprayed many different brands of lacquer as well
as types including waterborne which. The Behlen Nitro is the
easiest and best of all I have tried, plain and simple.
Getting to it:
With the guitar sanded to 220 grit and clean and free of sanding
dust.
Pre Stain: If you are going to do a rub on stain or burst using
either a stain from a big box store, Dyes or anything of the sort
you will need to have it done at minimum 24 hours before you start
to spray any finish on it.. A few days is better yet. I do most of
my bursts and stains this way and I won't get into how that is done
because it is a whole other conversation.
Prep:
Sand body to 220 grit, blow off with a compressor and wipe down
with a tack cloth. You can get a tack cloth at any home improvement
store. I also tend to only handle the guitar with Nitrile or
latex gloves at this point. Gotta keep the hand oils off the
guitar.
To start with: on all guitars it needs what's called a
"washcoat" which is lacquer thinned out 40-50% with reducer.
Brand: Behlen Stringed Instrument Lacquer and Behlen Lacquer
Reducer. I can tell you from experience that if you're using
the Behlen Nitro, you NEEDto use the Behlen reducer because the big
box store stuff will yellow the nitro. You can and should use the
cut rate local hardware store lacquer thinner to clean your gun
though.
Step 1:
(2) washcoats sprayed 2 hours apart 50% Behlen Stringed
Instrument Lacquer and 50% Behlen Lacquer Reducer
Step 2:
Grain filler. Woods that I know of that will need grain
filler are: Paduk, Ash, Mahogany, Koa and Walnut. I currently
use the Timbermate Brand grain filler for no other reason than I
have been using it for years on cabinetry. This is water
based so it is extremely easy to thin out and work into the grain.
I mix it with WARM water and mix until it is the consistency of
guacamole. It is completely fine to have it thicker or
thinner. It doesn't seem like it will fill the grain when it
is thinner, but it will. As I said in my intro, the grain in
Mahogany and Paduk is pretty severe so if you're using these types
of wood, you will need to grain fill them. You need to be prepared
to do at very least 2 coats of grain filler.
How to apply:
Once it is mixed to the desired consistency, go ahead and wipe
it on using a paint brush, a Behlen Grain Filler Spreader, Bondo
Spreader or even an old tee shirt. I use a paint brush and
the Behlen spreader. You're going to brush it onto the guitar
going across the grain... wait a few minutes and once the filler
starts to dry (the color will start to lighten up) holding the
spreader at a 45 degree angle, wipe of the excess with the
grain. Wait 24 hours and sand it smooth. If you get it
in the light, and get it to glare, you will be able to see if you
filled it enough. I can almost guarantee you will need at
least 2 coats. The guitar I am discussing took 3 coats to
fill the grain. While I'm on it, you can pretty much use any
color you want to for grain filler. One of the most common
things is to use the opposite color as grain filler, but on this
guitar (medium brown, dark brown and orange colored wood) I went
with an ebony colored grain filler. I wanted to make absolute
certain that I would not take away from the amazing top my buddy
Rob made me. Once grain filler is dry and grain is filled,
sand to 320 grit.
*Wait at least 24 hours (longer is better) after using water
based grain filler before the next step*
Step 3:
Sealer coats:
I use the Behlen Vinyl Sealer minimum 4 coats (body only, not
the neck). You can use the lacquer for this but it doesn't
sand nearly as easily as sealer does and it will clog up your sand
paper unlike sealer. Depending on the size of your needle in
your gun, you may have to thin the sealer as well. One of my guns
has a .08 needle and I have to thin it down up to 50% depending on
how cold it is in my buddies spray booth. My 1.4 tip gun, I
thin it down 10% on average. You will need to figure out your gun
which is a whole other conversation but there are plenty of videos
on youtube that can help you there.
Spraying the sealer: As I said: Minimum of 4 coats,
sprayed 2 hours apart and no more than 3 coats per day.
Once you have your 4 coats laid down wait 24 hours and then sand
back using a block and some stikit sandpaper. I have a 10"
long block and I go sideways with it. The main goal here is
to get the finish perfectly flat. Best to do it now and not chase
it from coat to coat. (trust me)
I finish this step with anything from 320 grit on up to 600
grit. My local Ace hardware sells these little foam sanding
blocks in various grits and I go with what they call 400 which is
closer to 600. All you're basically doing here is trying to
make sure you don't have scratches too deep or widebutyou do need
to have some smaller scratches there for the next coats to really
lock in there. Blow off with compressor, and then tack cloth
it.
Step 4:
Color:
If you are going to spray color such as a burst now is the time
to do so. I did not add color on this particular guitar but have in
the past. Get yourself a jelly jar and add some Behlen
Stringed Instrument Lacquer to it, mix in some dye... I use the
Transtint Dyes because I can get them locally. This one is
going to be an eyeball type of deal depending on how light or dark
you want the color. Basically on a traditional 2 color
sunburst you have amber and black or tobacco brown. The way I
do it is to (using my airbrush) do the black around the edges and
get that how I want it and then shoot the whole thing with the
amber and my regular hvlp gun. I spray over the black and
everything because you will never see the amber on the black. Do no
more than 3 color coats (each color). Wait 24 hours, sand it
back and get it to 600 minimum, blow it off, tack cloth it and move
on to clear coats!
Step 5:
Finish Coats:
You're going to need to get a minimum of 8 coats on. If it
is your first time spraying or doing this, you're going to need to
make sure you get at least 10 coats... 12 would be better.
Remember, too few coats and you will sand through later, too many
coats, you will get "checking" or cracking. Do no more than 3 coats
per day no matter the temp. You can do what's called a tack coat,
which is a light coat and come back an hour later and flood
it. I have done this but it's not great for beginners.
It's far too easy to get sags or runs if you don't have any
experience in using a spray gun. I shoot 3 "regular" coats
anywhere from 1-2 hours apart. Usually, I set my phone timer
to 1:40. With nitro, you do not need to sand between coats
unless you get past 24 hours, but I would imagine that it would
still be fine to do so without sanding it back, being that nitro
will do what's called "burn in" where it melts into the coat
underneath. This is what makes nitro forgiving to work with.
If you have weird spots that look like bubbles, or craters you can
put a couple drops of Behlen Fisheye Flowout in your lacquer on
your next coat. I can't stress to you enough, if you are
buying your first quarts of lacquer to give this a try... buy it
with your first quart. Also, if you are in a high heat, high
humidity area you can use some Behlen Lacquer Retarder. This
will help slow down the cure time to let it cure more fully without
trapping a bunch of moisture in it. Anyhow, after you get to your
final coat, wait 10 days... ideally, you will have the guitar body
hanging to let it cure and off gas. After 10 days, you can
start wet sanding.
Step 6:
Wet sanding:
Depending on how good of a job you did with your spraying you
can start with 1000 grit. If your finish is really rough, you
can start with a heavier grit but remember, you can very easily
sand through. I have gotten good at spraying over the years
and can start at 1500 grit so stick with it and your life will get
easier. Sanding mixture: I use tap water and Murphy's
soap. I have heard different amounts of soap from different people
but I use 1% give or take. You can use a couple of drops and
it will be just fine. I like to make up the mixture the night
before and put my sandpaper in it and let it soak overnight, that
way it is soft and pliable the next morning when I am ready to
sand. When you do start wet sanding, you will need a good light, or
the sunshine. Sand in a small area and wipe, then look at it in the
light at all angles. Keep on sanding until you get all the
shiny spots out. Once you get that done, move up to the next
grit.... all the way up to 2500. As I said before, you are
making your sanding scratches smaller and smaller as you move up in
grits.
Step 7:
Buffing:
I do not have one of those amazingly awesome buffing
machines. What I do have, is an 18V Makita drill and a 3"
Velcro backing pad I ordered off Amazon. You can get the
whole set for around $12 if I remember right. The pads that
come with it are basically not great, and they don't tell you what
pad is hard, soft or anything. It's really tough to figure it
out. I use the Meguiars pads for their DA buffer. I do
not have the buffer, just the pads. They Velcro right on to
the backing pad I got with my set from amazon. They have
maroon which is hard, yellow which is softer and black which is the
softest for waxes. All of the compounds I use are Meguiars
and you can get them at Auto Zone or pretty much anywhere. If you
get it to 2500 grit with your wet sanding like I do, you can go
ahead and start with "Medium Cut Cleaner" on the maroon pad. I put
the compound directly onto the pad and give it a light squirt of
water with a spray bottle. Start off slow otherwise you will
end up wearing a lot of compound. As soon as you feel like
you won't fling it everywhere, turn up the speed on your drill and
keep moving,do not let it sit in one place. Grab a microfiber
towel, and wipe off the compound. Get another new pad, then I go to
machine glaze and repeat the process. You need to use
different pads and microfiber towels for each compound you use.
(trust me) lol. After the machine glaze, I let the guitar sit for a
couple more days and then wax it. You can assemble at this
point and then wax around your controls and so on but since mine
are for paying customers, they get wax everywhere. I personally use
the hi tech yellow wax but any wax will work. You need to wash out
your compound and buffing pads as soon as you are done using
them. Warm water.
In Closing:
(2) wash coats 50-50
Behlen Stringed Instrument Lacquer and Behlen Nitro Reducer
Sprayed an hour or two apart
Grain filler (2 coats
minimum)
4 Coats of Behlen Vinyl
Sealer sprayed 1-2 hours apart no more than 3 coats per day
3 color coats 1-2 hours apart no more than 3 coats per day
8-12 coats of Behlen Stringed Instrument Lacquer 1-2 hours apart
no more than 3 coats per day
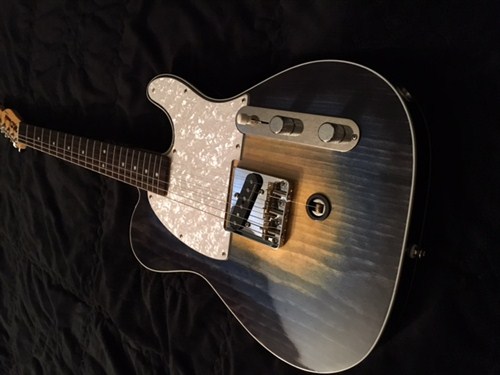
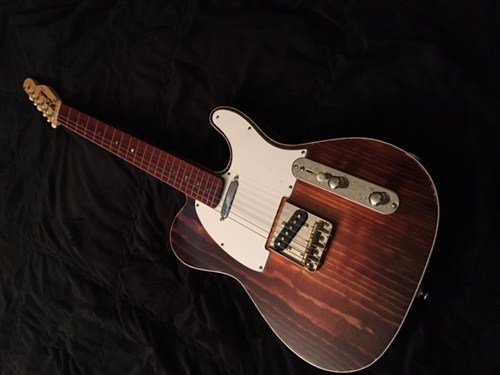
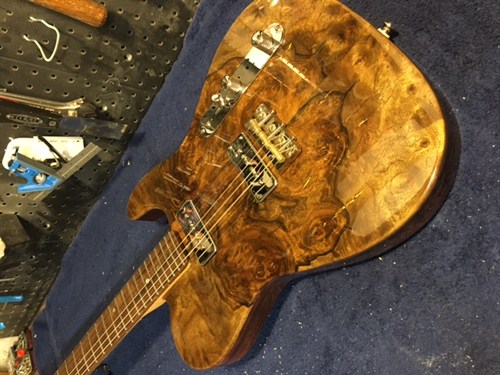
More Guitars finished with Mohawk and Behlen Products by Kelly
McDonald:
Other products from Behlen used are:
Fingerboard oil
Fisheye Flowout
Lacquer Retarder
Behkol
Solvent
Naptha Solvent
Hide
Glue
Furniture Powders