Congratulations to John Chando from Chando Guitars
on being our December Guitar of the Month winner! Let's find out
how he created this beautiful electric guitar.

"Ladies and gentlemen, I
am happy to introduce The Chando Reverse Bamboo Blender Stratic
Electric guitar. It's a Fender Stratocaster inspired guitar and
it's one of my favorite guitar designs. I won't bore you with all
the details. So in short, the guitar body and neck is completely
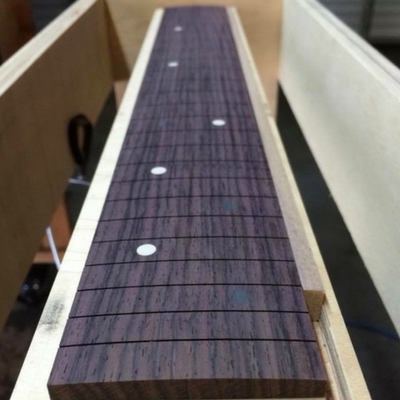
handmade from locally procured hardwood boards. The neck is
flat-sawn hard maple with a laminated Indian Rosewood fretboard.
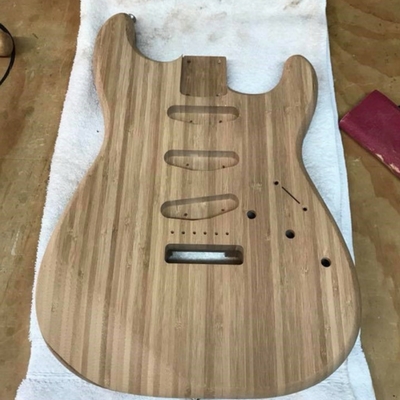
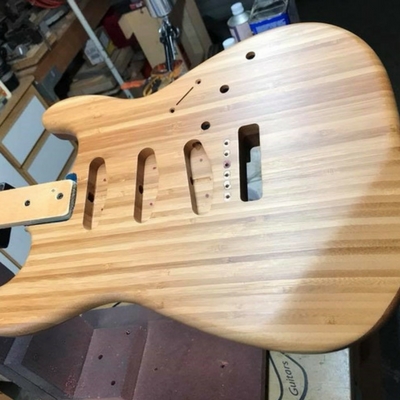
The guitar body is half Sapele and half laminated bamboo. The
"Reverse" part of the guitar's name is due to the left-handed neck
design on a right-handed body. The other reason for the Reverse in
the name is, compared to the typical Stratocaster bridge pickup,
the bridge pickup on my guitar is offsite in the opposite
direction. The "Blender" part of the name is to identify the unique
wiring of the guitar pickups using a blender potentiometer to
achieve multiple pickup configurations and tones.
The finish on the Chando
Reverse Bamboo Blender Stratic Electric guitar is in a clear Mohawk
Nitrocellulose Lacquer. The guitar's neck has about 8 coats of
lacquer, not including 2 coats of vinyl sealer. The "Chando" logo
on the headstock is a screen print and a couple coats of lacquer is
sprayed over that to help seal and protect it. The guitar body was
lacquered in the same manner except for the addition of multiple
coats of lacquer over the "Chando" decal located under the bridge
to give the decal a seamless look.
I start the finishing
process by prepping the wood. The maple and bamboo needed to be
sand smooth starting with an 80 grit sandpaper, then moving to a
150 grit, and final sanding using a 220 grit sandpaper. The sapele
wood was treated in the same manner. However, it's a very porous
wood, so it needed to be grain filled to eliminate holes and pits.
I usually spray a coat of sealer prior to grain filling. And I
usually grain fill and sand, then repeat the grain filling step,
one more time or multiple times, if needed. Once all the grain is
filled and sanded smooth with 220 sandpaper, a 50/50 mix of vinyl
sealer and lacquer thinner mix was sprayed on using my trusty
Ingersoll Rand 270 gravity feed spray gun, which is powered by a
6HP, 25 gallon Craftsman Professional air compressor. The first
coat of vinyl sealer is allowed to dry for one hour. Then it is
scuffed sanded with 320 grit sandpaper. A second coat of sealer is
then sprayed on. As I said earlier, the maple wood grain is so
tightly closed, that a couple coats of sealer is plenty. Sapele, on
the other hand, requires 3 to 4 coats of vinyl sealer to achieve a
nice flat surface.
Once the final coats of
vinyl sealer are sprayed on, it is lightly scuff sanded with 320
grit sandpaper. The next step in the finishing process is applying
the nitrocellulose lacquer build. I like to start with a lightly
mist coat of 50/50 mix of lacquer and lacquer thinner. I wait about
5 to 10 minutes before spraying the next coat, which will be a nice
thick wet coat of lacquer. I let these 2 coats of lacquer dry for
one hour and then I repeat this process again with 2 more wet
lacquer coats. Afterwards, I wait 24 to 48 hours before I spray
more lacquer. The next lacquer coats will be a 3:1 mix of lacquer/
lacquer thinner. Again, I spray one wet coat. I let it dry 5 to 10
minutes and then a second thick wet coat is applied.
I wait one hour before
spraying the third wet coat. The third coat sits up for 5 to 10
minutes and the forth wet coat is sprayed on. I let all these coats
dry and melt together for one week before I level sand using 320
grit sandpaper. I sand smooth the lacquer until I remove most of
the shiny spots. The next step is to spray 4 more coats of a 3:1
lacquer mix. I wait another week until I level sand the lacquer
using 320 grit sandpaper. Lastly, depending on how I feel, I will
spray the final 2 or 4 lacquer coats, full strength, with no
thinning and depending on how hot and/or humid it might be, I might
add a few ounces of retarder to delay the dry time to avoid
blushing.
Now that all the lacquer
is sprayed on the guitar, I let it cure for about 2 to 3 weeks
before I decide to wet-sand and buff the finish. Most of the time I
skip this process because my spraying technique produces little to
no orange peel. But, when I do polish and buff, it's only the
guitar tops. In this case, I had a decal located under the bridge
that was still showing its edges. The only way to eliminate the
decal edges from showing is by wet sanding and polishing the area.
I start with 1000 grit wet and dry sandpaper and work my way up to
2500 grit. Next, I buff and polish the body using a hand held
electric rotary polisher with a soft foam cutting buff pad. I use
Meguiar's Swirl Remover compound to remove the sanding marks and to
bring the lacquer to a high shine. Additionally, I use a microfiber
towel to remove any polishing compound haze.
That's about it.
Protecting a project with nitrocellulose lacquer is a tedious and
time intense process. However, if done correctly, the end result is
a stunning and beautiful finish."
Thanks for sharing
this with us John! If you have any questions about the guitar, our
products, or anything touch up related, feel free to reach out. If
you would like to be considered for our Guitar of the Month for
January, submit your before and after photos on our Facebook
page or group, or tag us on Instagram.
See you next week!