Our October Guitar of The Month winner is David
Paetow! He built a super unique guitar and is ready to
share it with us. Read on to hear David explain why he prefers this
style of build and how he finished it!

"I like to travel, and bring a guitar along with me on trips. I
had a couple of Steinbegers, even though they were small and
indestructible. I never bonded with the tone of them, plus they are
rather heavy for how small they were. So a few years ago I decided
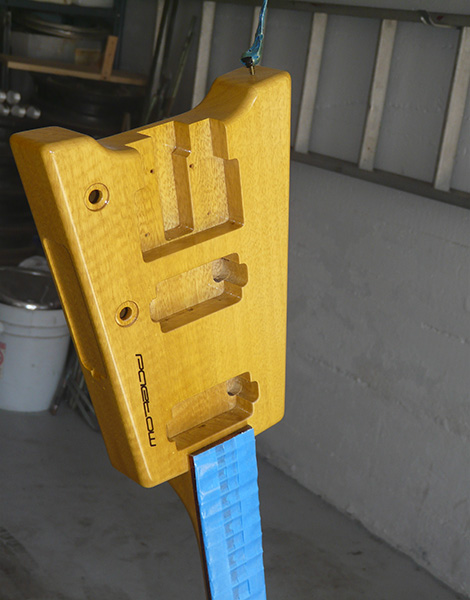
to build a lighter weight headless guitar. I chose African Limba
wood, otherwise known as 'Korina'. Since I have been wrenching on
guitars for 30+ years, I knew it was within my abilities to create
this guitar. I'll spare you the details about actually building it,
but basically it is a Steinberger body shape but with a 22 fret
neck instead of 24. It uses a Steinberger bridge and headpiece, and
the electronics out of a PRS Custom with a rotary 5 way switch.

Now onto the finish work! I'm trying not to be long winded here
to bore everybody, so I will get to the point. Since there is a Rockler
woodworking store near me, it's handy to buy Behlen products,
so that is what I used. Once I had the guitar built, I did all the
finish sanding, raising the grain, and eventually worked my way up
to 320 grit, making sure all the sanding marks were gone. Then I
pore filed the guitar, and re-sanded with 320 to make sure it was
ready for paint. Then I shot a couple coats of Behlen Sealer over the whole guitar. I
let that cure, sanded that with 320 until everything was smooth,
then shot a coat of very thinned out Behlen Stringed Instrument lacquer and let it
sit for a couple days. I examined the guitar carefully at that
point to make sure the guitar was sealed and very smooth. Then I
proceeded with the color coats.

I wanted to replicate the color used on old Gibson Korina V's
and Explorers from the 1950's, so I wanted an amber finish on it. I
again used very thinned out Behlen Stringed Instrument Lacquer, added some
amber tint, and used my trusty door jam spray gun to shoot the
color coat. I let that sit for a day and examined it to make sure I
was satisfied with the color. I decided it need a little more tint,
so I shot another light coat, and then I was satisfied. Then I shot
the clear coats.
I think I shot 3 or 4 clear coats on the guitar. Then I let it
sit for a day, did some scuff sanding to get rid of any orange
peel, then applied the water transfer decal. Once the decal was
dry, I shot a couple of light clear coats over the decal. I let it
sit for a day. Then I shot the rest of the clear coats. I think I
did 4 coats a day, then let it sit for a day, then I scuff sanded
it, to level out where the decal was placed, at that time I then
shot the final clear coats. After that, I let the guitar hang for a
month to cure. I like to let the finish cure for as long as
possible, so the finish hardens up before hitting it with the
buffing wheel. Then it was wet sanded and buffed out. I
assembled it, and It turned out really nice, and has traveled with
me all over the USA!"

Thanks for sharing this with us, David! If you have any
questions about the guitar, our products, or anything else, feel
free to reach out.
If you would like to be considered for our Guitar of the Month
for November, submit your before and after photos on our Facebook
page or group, or tag us on Instagram. See
you next week!