Over the past several months, we have been very fortunate to
work with several different bloggers and diyaficionados on helping
them create, refinish, or touch up wooden furniture. In order
to make it easier to find which project helps relate to yours the
most, we decided to aggregate four of our wood based projects onto
one article! This includes projects by Elisha from Pneumatic
Addict, Bethany from Reality Daydream, Brynne from DYI Inspired,
and Tasha from Designer Trapped in a Lawyer's Body.
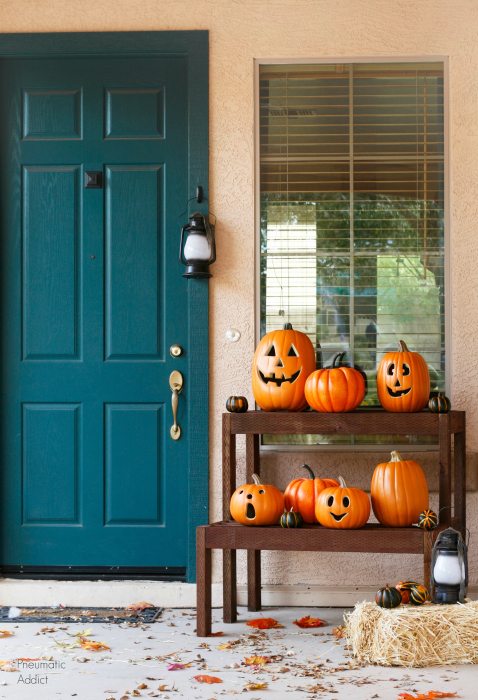
Pneumatic Addict
Blog post: How to Build an Outdoor Tiered Display
Shelf
While this display shelf was created with Halloween in mind, it
can be used for any occassion. Perhaps you could place fresh,
bright flowers once spring arrives, or a variety of small pine
christmas trees with tree lights on them; the possiblities are
endless! Elisha takes you through not only the proper
materials you will need to make this shelf, but also a dye stain
that dries quickly, and also results in a full, rich color, whether
you wipe or brush it on.
Required Materials:
- (8) 2x4x72" pressure treated boards
- 2-1/2" deck screws
- 2-1/2" weather resistant pocket hole screws
- Circular saw or Miter saw
- Power drill
- Kreg jib
- Speed square
- 1/8" drill bit
- Behlen Solar-Lux NGR Dye Stain
Reality Daydream
Blog Post: Adult Coloring Book Inspired Stained Art
Our Ultra Mark wood touch up markers are not just for touching
worn, torn, or beaten edges, they are also perfect for creating
art. Bethany from Reality Daydream is known for her wood
shading techniques, so we challenged her to use our Ultra Mark wood
stain pens in one of her creative fashions; and she did just that.
With an assortment of Ultra Marks in hand, Bethany got the
entire family involved on this full-scale coloring book.
Required Materials:

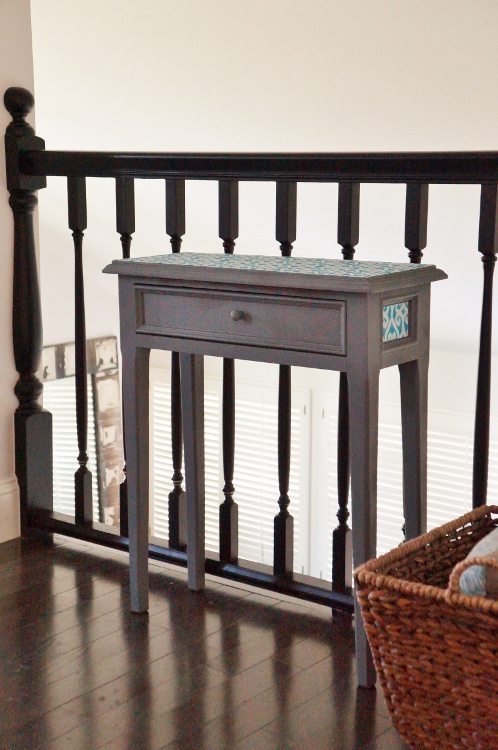
DIY Inspired
Blog Post: Wooden Side Table Makeover
DIY project inspiration can come from anywhere, whether it is an
item you see in a consignment store, a change of style in your
home, or even your friend asking for your help in transforming a
wooden side table into something you can be proud of. Dinah from
DIY Inspired helped her friend turn a worn side table into a table
piece in here room in just 2 hours. She used Mohawk Epoxy
Putty sticks to repair the surface of the table, and simply painted
the rest.
Required Materials:
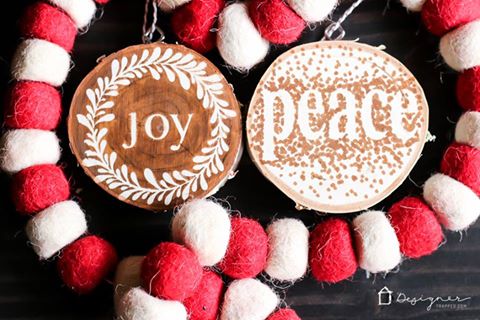
Designer Trapped in a Lawyer's Body
Blog Post: Easy & Beautiful DIY Wooden Ornaments
This DIY project isn't just easy; it's chic! Tasha from
Designer Trapped in a Lawyer's Body has posted some great DIY
projects that can be done by anyone, but this one gets us in the
Christmas spirit. She takes small wood slices around 3 to 4
inches in diameter and creates ornaments with them. Not only
this, but she personalizes them with messages and designs.
Materials Required:
- Mohawk Ultra Mark wood stain marker
- Small Screw eyes
- Vinyl and cutting machine or craft stickers
- Wood slices (3 to 4 inches diameter)
We want to thank every one for such a wonderful year full of
inspiring DIY projects, revitaliizng touch ups and repairs, and
guitar finishing projects. We want to wish everyone a very
merry Christmas and happy holidays, as well!