Since our luthier community are some of the most passionate
individuals whom we have met, we decided to highlight one guitar
project per month, and feature it on our blog. In order to be
featured, one must showcase the guitar they worked on, the
Mohawk/Behlen products that were used, and a short story about why
this guitar project is important to them. From there,
individuals from Mohawk will collaborate and announce a winner.
When a winner is announced, we will reach out and begin writing
about the project. Winners will receive Mohawk/Behlen guitar
finishing items in order to congratulate them on a job well done.
Find out more about our guitar products here: http://www.mohawkconsumerproducts.com/products/guitar/#Guitar
Repair
This month's winner is Sam Eakins, and this is his story.
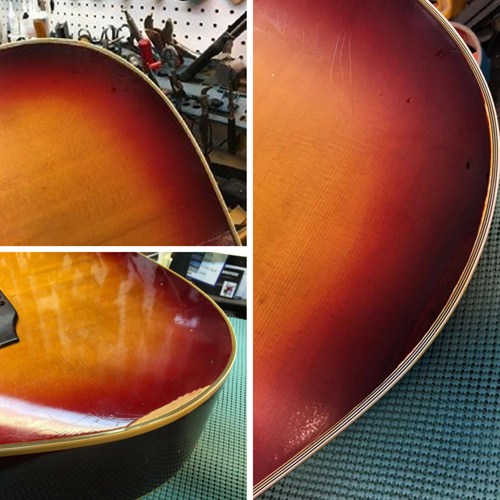
" Working towards perfection. Cosmetic repair on this
vintage Gibson. One of the challenges with repairing vintage
guitars is to fix what needs to be fixed and not hurt the
collectible value of the instrument. There are a lot of
complicated points to be made on what establishes the value of a
vintage instrument. This guitar had some large gashes
previously repaired and an attempt to cover the damage with
something that was in the same color family but not right. It
was probably nail polish and actually magnified the repair.
It was like a food stain on a white shirt saying, 'HEY! Look
at me!'

This top is on a guitar that is loved and played in...years of
writing songs and miles of gigs. It's got patina and weather
checking - it has a story. So, we want to leave the mileage
and make the obvious 'uglies' go away, or almost invisible.
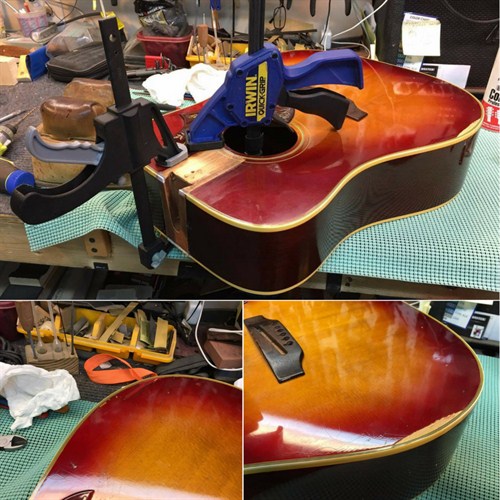
First thing is to understand how the manufacturers applied
the original finish. I start the repair process by scraping
away the discoloration and damaged finish. I have years of
experience doing this and have had benefit of some amazing teachers
throughout my career. Scraping down to clean wood then
layering and building back is the way. Clean wood tells the
truth and the end result will be more natural looking. I've
tried to squeamish dab a little here and there and don't disturb
the vintage finish monster or he will eat you alive, lol. Or
reality is it eats valuable time in the shop and still not look
great. Time is priceless when you have hundreds of guitars
passing through annually that need to be fixed.
Once I've established a clean edge, I apply a thin coat of hide
glue with a q-tip. The hide glue is thinned with deionized
water to the consistency of buttermilk - runny but not too runny.
Let it dry. This provides a barrier to protect the clean
appearance of the wood. If I started applying anything like
CA glue or lacquer, it would discolor the wood unnactually and be
splotchy. This is also the same technique I use to repair
cracks in under-humidified guitars. You know, you get the
guitar healthy and the crack closes up and when you finish the
repair, you've got a fine dark line where the crack was. This
helps eliminate that cosmetic issue. Next step is to raise
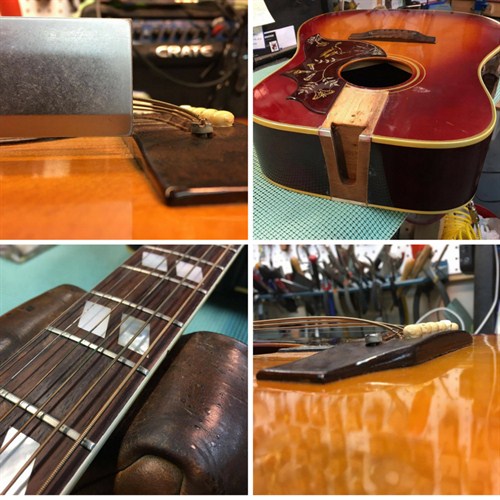
the finish and add color as we go. You can see in the picture
how thick the mils of the finish are. After the hide glue
dries clean around the edge and start layering CA glue. I use
a couple of brands - not all glues are created equal. Do some
research. I use a medium thin viscosity (thicker than wick
grade thinner than medium). Now the trick on Cas - you can
spread out your application then go eat a sandwich, or play
solitaire. Come and check and it may be set or not. I
know that the bottle says 10 seconds, but that was in a lab
applied in a specific measured amount in a controlled environment.
So grab the accelerator! Squirt it on there, and boom,
you got some smoke. Now you got swirls of milk and the
vintage finish next to the CA is melting! I use acceleration all
the time and never have this problem.
What type of accelerator you use is just as important as how
it's applied. When selecting an accelerator, in this case,
I'm working with lacquer so I have to make sure that my kicker is
not acetone based. Acetone melts lacquer. I've always
used Zip Kicker; it does not have an acetone as a carrying agent.
The next thing is how it's applied. I've never had
consistent results with aerosols or pump spray bottles. I use
a badger airbrush with gravity feed bottle with adjustable flow
needle. I use a small PSI air compressor providing about 12
to 15 PSI with a simple moisture filter inline similar to the setup
in the picture.
Before I apply my initial layer of CA, I spray a light mist of
Kicker to the repair area from about 10" away evenly. Let it
evaporate then apply CA medium or medium thin. With the
Kicker dry, but present, it will react but at a slower pace.
The result will be evenly cured CA without milking. You
will see it shrink slightly but that's fine you have more layers to
go. The next layer goes on and since the Kicker is still
present in the first CA application, it will react but must slower
so you have time to smooth it out. Then you spray Kicker same
as before on top of the 2nd layer, and you get an instant
reaction.
Then, mixing and matching dye to get shading right.
I use lacquer thinner to mix with. Then, I can just add
the same measured amount in Behlen lacquer to start building the
color so my mix is usually 50/50. In this case, I'm matching
aged cherry. The more layers of cherry added, then the darker it
gets. Then I will add a drop of brown if needed as I go. I
use a soft brush and patience. Or a fine detail airbrush with low
PSI. Remember, I'm still many mils from a level finish.
Important lesson: I tape off just inside the edge of the
original finish when you start building your color if you overlap
or bleed onto the original finish, it will always create a dark
outline. Sometimes it's unavoidable but this helps. Once we get
close on our color, remove the tape and lock it down with a thin
coat of clear. By now, I'm only a couple of layers of CA to
get level. I usually build just passed the level of the
original finish then use a razor blade to scrape it flush.
Then, wet sand with 800 to smooth it out. Then I use a
gravity feed detail spray gun (1.5 mm needle 30psi) with 50/50
Behlen and red mahogany dye in the mix to bring the edge of the
burst in and do a blending wash around the bout of the guitar.
Once I get the blend the way I want, I lock it down with a few
coats of Ultra Bond. I like the option of "rattle cans"
especially when it's a great quality product you can rely on.
I use rattle cans for convenience factor also. If I've
got my spray guns loaded with tinted product for other jobs, now
I've got my color locked under a few coats of clear as a buffer.
I will scraped the binding clean again. You all are asking
the question, "why didn't you mask the binding off?" Well ladies
and gentlemen, my experience has been you take a good amount of
time to do a detailed mask, and no matter how well I do and no
matter what quality of tape I use, there is always bleed. You
will have to scrape the binding anyway, so I eliminated that step.
I do mask all other portions of the guitar that should be
protected from over-spray. Then, wet sand with 800, 1000,
2000 and then a diamond dust 3000 grit pad (3M products used in
auto body repair.)
Then with guitar in hand, I go dance with Buff Bagwell.
I use two different buffing grits; medium and fine (Menzerna
polish bricks). Since this is new lacquer, I use lower speed
and go straight to fine grit. On fresh lacquer, I like to use
the 3000 diamond dust wet sand pad (as I mentioned earlier) in
place of the medium grit buffing step. I have more control on
the take away aspect of the new finish. Then the fine buff is
quick constant motion with lighter contact on the wheel. Lower
speed and keep moving with lacquer, not trying to generate heat.
If this were a poly finish I would use slower movement and
higher buffer speeds because you want to heat the poly up to get a
proper shine.
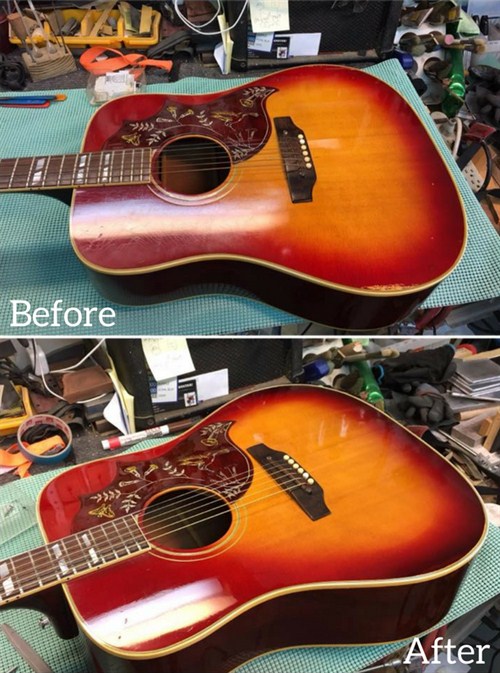
With repairs like this, you will see a degree of the finish
anomaly. The standard is to achieve the highest level of
invisibility you can without making the finish look out of place.
The customer did want the top refreshed and buffed "shiny" but
leave the mileage. Literally stripping the finish off of the
entire top and duplicating the original burst I think would be
easier, but then you erase the guitar's history."
If you would like to be considered for our Guitar of the Month
for December, submit your before and after photos on our Facebook page, or tag us on Instagram.