Congratulations to Adam Bath from Elysian Pickups, LLC on being
our July Guitar of the Month winner! Let's find out how how he
crafted this gorgeous green monster.

"I've been using Mohawk lacquer since I first started spraying
lacquer back in 2006. It's always been easy to obtain, the results
are stunning, and it's an excellent finish. It also wears
incredibly well with age, dries hard, and is ready to buff fairly
quickly after spraying. I was really surprised when they reached
out to me asking to write the July Guitar of the Month post, thanks
Mohawk!
I've been building guitars since 2006, when I went to Roberto-Venn and got my
first taste of in depth luthiery. Before that I had done tons of my
own repair work, but never gone so far as to build my own
guitar.
After Roberto-Venn, I set off on my own and tried to build a
name for myself as Elysian
Guitars. I did that full time until 2012, when I took a job
with Collings
Guitars, and really learned how to step up my finish game.
Collings didn't use Mohawk, but it was still great experience in
spraying, sanding, and buffing lacquer. After Collings, I went back
to doing my own thing, and that's when I built the guitar that
Mohawk choose to feature for Guitar of The Month.
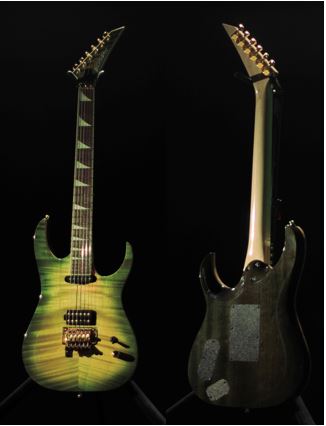
This guitar features a khaya mahogany body, flamed maple top,
and a bound maple neck with a rosewood fretboard (the neck was
originally a Jackson neck). I completely reworked it, including the
flamed maple head cap that I inlaid into the original binding. The
stain was done with green and yellow aniline dyes from LMII.
The body for this guitar was CNC cut, the first time I ever
attempted a carved top. It is a standard superstrat type shape, has
Bareknuckle
pickups, and has Schaller
tuners.
Before I get started on the finish, I just want to share one of
the most important parts to guitar building and finishing. Have a
good sanding block that work well for your hands. None of my
sanding blocks are off the shelf, they're all hand made. My
favorite blocks are made from chunks of phenolic resin, with sheet
rubber glued to them. The blocks are dead flat, the rubber is even
sanded flat, and the end result is a perfectly flat sand every
time. They're only big enough for the sand paper strips I use, and
I have specialty blocks that I have made for getting into corners,
for sanding recurves, and for sanding intricate carve tops. Teflon
type materials make great blocks as well, as they're hard enough
that they won't deform, and they're easy to shape.

I keep my process fairly simple. I start with sanding the body
to 320-grit, after it's shaped to its final form. After the
320-grit sand, I raise the grain with a damp paper towel, then let
it dry. After it dries, I sand it again with 320 grit sandpaper,
and mount the body to a stick via the neck pocket, so I can hold it
and place it on my drying rack. The stick is made from 1" Delrin,
and is mounted to a square of MDF that closely matches the neck
pocket shape.
After cleaning the surface of the guitar with Naptha, I taped
off the body, leaving only the faux binding exposed. I sprayed two
coats of
Behlen E-Z Vinyl sealer, so that the stain won't penetrate the
wood, leaving a crisp edge when I spray the stain on. After this, I
remove the masking and start staining the body. I use alcohol based
stains so that the grain doesn't raise again, and spray them out of
an HVLP spray gun at low pressure with the knobs adjusted so very
little stain comes out. On this, I sprayed the yellow stain on the
top first, then did the darker green stain for the burst effect and
the back. After the stain dries, I go back and scrape any overspray
off the faux binding area for a 100% clear look.

After scraping the binding, it's time to spray sealer on the
whole guitar. I initially spray a total of 3 vinyl coats on my
guitars, waiting about 15-20 minutes between them, depending on how
hot it is in the booth. After these three coats, I apply my pore
filler, in this case Timbermate's black pore filler. After the pore
filler dries I sand it back with 320-grit so all that remains is
the filler in the pores, then I do another coat of vinyl sealer,
and quickly after that spray the first coat of lacquer so that it
bites into the sealer.
For the first day of lacquer, I spray 4 even coats, waiting 45
minutes between coats, and cleaning the surface with a tack rag and
Naptha before each spray. Cleanliness is the most important thing
to getting a mirrorlike gloss from a guitar.
After those coats, the guitar goes on my drying rack overnight,
and first thing in the morning I do a quick level sand, not trying
to go too deep, just enough to get the lacquer to adhere. Most of
the pores still show at this point. After the sand, I clean and
then tack rag the surface, and spray another 4 coats, with the same
45-minute drying time in between. After those coats, it goes back
on the drying rack for the night.
On the 3rd day of lacquer, I sand it until none of
the pores show. If I can get all of the pores out then this turns
into the final day of lacquer. If not, there has to be a
4th day, but I keep those coats light. The goal is to
have only as much finish build up as necessary to avoid cracking
after it leaves my shop. My finishes are typically 10mil or less.
On the third day of lacquer, the guitar typically gets 3-4 coats,
depending on how much I have to sand to get the guitar flat.

One step that a lot of builders miss that makes a world of
difference is sanding the edge of recessed control cavities. I
typically use a cylinder with some sand paper for this, and just
break that edge enough so that finish doesn't build up there, and
the edge stays nice and sharp. This will make fitting cavity covers
much easier.
After this, the guitar cures for 2 weeks before any sandpaper
touches it again. On my wet sand, I start with 800-grit. If there
aren't open holes for water to get down into, then I just use
water. On places like the headstock, especially the back, or where
there are screw holes, like for a pickguard. I use Naptha as my
liquid, so the wood doesn't swell. I typically do all my wet
sanding by hand on guitars, but an orbital with 800-grit and
1000-grit pads does help.
The backing pads that come with most orbitals aren't flat. So,
make sure you sand them on your sanding table from multiple
directions, marking the surface with a white pencil so you can see
where you need to focus. Flatness on sanding tools is paramount to
a flat finish.
After I sand with 800-grit, going parallel to the grain of the
wood, I repeat with 1200-grit, but go cross grain, perpendicular to
the grain of the wood. I find this really helps to knock out the
800-grit scratches. After the 1200, I return to sanding parallel to
the grain with 2000-grit.

With buffing, I have several approaches. I use smaller wheels in
the horn areas and most of the neck, and use larger wheels for
majority of the body. I only use Menzerna buffing compound, using
only 2 grits of it. After I use the pink compound, I either switch
the wheel out or rake it off clean, then switch to their tan #3
compound. I find this compound is sufficient for my final buff, as
I take so much of the scratches off with the 2000 grit. I have used
the brown #8 cut in the past, but it's not really necessary if you
start at 800 grit.
After the buff, I assemble everything, and start polishing with
Novus #1 clean and shine. Then it's time for glamour shots!

If you would like to see more of my work, please feel free to
follow me on any of the major social media sites, Facebook, Twitter, Instagram.
And check out my website, it's a work in
progress, but will soon have a functional store for my guitar
pickups."
Thanks for sharing this with us Adam! If you have any questions
about the guitar, our products, or anything touch up related, feel
free to reach out. You can share your thoughts with us on Facebook,
Twitter, or Instagram!
Stay tuned for the next blog post - there's something new every
Friday!